Photoshop Draw Perfect Circle Outline
Step-by-Footstep Tutorial
Create A New Document In Photoshop
First, locate the top of the Photoshop workspace.
Select File and within the File drop down tab, select New… to create a new document.
The New Document window will announced which allows the new document to be customized.
Within the New Document window, find that the right side of the window is where the Preset Details gives unlike options to create the new certificate.
Side by side to Width, observe how Photoshop is going to measure the size of the document. The certificate can be measured and sized in numerous ways such as by pixels and inches.
Select the drop-downward arrow and select Inches.
Within the Width and Height boxes, type in 10 as the width and peak.
In the Color Fashion drop-down, select RGB.
Within the Background Contents drop-down tab, select white every bit the colour that will be the background.
In one case the correct settings are prepare, hitting Create.

![]()
A white x x ten document will appear in the Photoshop workspace.
Create A Circle: Using the Elliptical Marquee Tool
The Elliptical Marquee Tool creates a moving outlined selection of the created shape to then be customized. Although an elliptical shape is not evenly round, a Photoshop shortcut will allow the shape to turn into a perfect circumvolve.
Locate the left side of the workspace where the Tool Bar is located.
The Tool Bar allows access to multiple tools to exist used to customize an image.
The Elliptical Marquee Tools is located within the Rectangular Marquee tab in the Tools Panel. This tool is identifiable by a dotted lined rectangle shaped symbol, which is located on the right side of the Motility Tool at the top of the Tools Panel.
Once located, select and hold the Rectangle Marquee Tool.
The Marquee Tool side tab will announced revealing unlike Marquee Tool shapes.
Select the Elliptical Marquee Tool, which is the second tool in the tab.
![]()
Now that the tool is selected, notice how the mouse symbol has turned into a plus-shaped symbol.
Locate the top of the workspace where the Elliptical Marquee Tool can exist customized.
Notice the various square symbols, one square past its cocky, two merged together etc. Each of the symbols represents how the marquee tool will be used on the new certificate. If the mouse is positioned over each squared symbol, Photoshop explains how it can add together, subtract, or involvement with a pick. In this case select the atypical filled in square, which represents New Pick.
The Feather option, allows the edges of the shape to accept a soft edge with a higher number or a hard edge with a low number.
For this circumvolve, set Feather at 0 so the circle will not have a soft border.
Select the checkbox for Anti-alias, which allows edges of a shape to be smooth.
Lastly, select the Blending Style to Normal.
The Blending Style tells Photoshop how the object should interact with the document.
With the cursor positioned towards the upper left corner, click and drag the mouse to the bottom right corner while holding Shift on the keyboard.
By holding Shift, this allows a perfect circle to be created. If Shift is not held, the circle will await more than like an oval.
Notice how the circle has a dotted moving outline.
Now, click and drag the circle and then that it is positioned in the centre.
2.two Elliptical Marquee Tool: Fill Circle With Brush Tool
Locate the left side of the workspace where the Tool Bar is located.
Within the Tool Bar, locate the Castor Tool, which is recognizable by a brush shaped symbol and is located underneath the Eyedropper Tool.
Select the Castor Tool or endeavor the Brush Tool keyboard shortcut by hit B on the keyboard.
One time the Brush Tool is selected notice the top of the workspace where the Brush Tool can be customized.
Locate the Brush Presets at the top left corner of the workspace where a preview of the current brush way is viewable along with a number below information technology indicating the size of the brush.
Select the arrow next to the Brush Preset.
The Castor Preset will announced which allows the brush to exist customized.
The starting time task is to select the brush.
At the bottom of the Castor Presets tab is an array of brushes to select from.
In this instance, select the very first round brush because the settings are going to be customized.
On the acme of the tab are the Size and Hardness options.
By moving the slider under Size, the brush will become larger with a larger number and smaller with a smaller number.
The Hardness option indicates how harsh or soft of an edge the brush will have.
With the Hardness at 100%, the brush will take a solid outline only if the hardness is ready at 25%, the brush will have a soft outline.
Fix the Size to 900 px and the Hardness to l%.
![]()
Once selected, hide the Castor Presets tab but unselecting the Brush Preset drib-downwards arrow.
Notice how at that place are two colored boxes at the bottom of the Tool Bar.
The color on the top represents the foreground colour and the color backside it represents the background color.
Double-click on the foreground color.
The Color Picker (Foreground Colour) window volition appear.
The Color Picker window reveals a variety of colors to choose from or to type in the color code at the bottom of the window.
In this instance, select a green colour.
Once selected, hit OK.
![]()
Now, only click and drag the mouse over the circle until the entire circumvolve is filled.
If the castor is too big or also small get back to the top of the workspace within the Brush Preset tab and adjust the size or effort using the [ and ] keys on the keyboard to adjust to the desired size.
In one case selected, the green color will announced in the circle.
To remove the selection around the circumvolve, locate the tiptop of the workspace.
Click Select and in the drop-downwards window select Deselect.
![]()
The moving outline volition disappear.
two.iii Elliptical Marquee Tool: Fill Circle with Paint Bucket Tool
Locate the left side of the workspace where the Tool Bar is located.
Inside the Tool Bar, locate the Gradient Tool, which is recognizable past a black to white gradient foursquare shaped symbol.
Once located, select and hold the Gradient Tool until the side tab appears.
The Paint Bucket Tool will appear as the second tool in the tab.
Select the Paint Bucket Tool.
![]()
Once selected, notice the summit of the workspace where the Pigment Saucepan Tool tin be customized.
The first section, which is the Source to Fill up indicator, asks how the object should be filled. This allows the foreground color or a blueprint to exist filled into the selection. In this example, choose Foreground.
Set the Mode to Normal so the color will fill with no alterations.
Set Opacity to 100% so the color will make full with a solid color.
Set Tolerance to 0.
Find how at that place are ii colored boxes at the bottom of the Tool Bar.
The color on the peak represents the foreground color and the colour underneath represents the groundwork colour.
Double-click on the foreground color.
The Color Picker (Foreground Color) window will appear.
The Color Picker window reveals a variety of colors to choose from or to type in the color code at the lesser of the window.
In this case, select a majestic color.
Once selected, hit OK.
![]()
Now, only position the mouse over the circle and click to make full circle with colour.
The circle will now exist filled in with purple.
To remove the selection around the circumvolve, locate the top of the workspace.
Click Select and in the drop-down window select Deselect.
The moving outline will disappear.
two.4 Elliptical Marquee Tool: Fill Circle with Gradient Tool
The Gradient Tool allows multiple colors to be applied and composite together in one sequence. In this case, a gradient will be applied to a circle to have a unique look.
Locate the left side of the workspace where the Tool Bar is located.
Inside the Tool Bar, locate the Gradient Tool, which is recognizable by a black to white gradient square shaped symbol.
Select the Gradient Tool or try the shortcut by hitting G on the keyboard.
Locate the top of the workspace where at that place are different options to customize the Slope Tool.
Notice the black to white slope box at the top. This is called the Gradient Picker where the gradient will be selected.
Select the pointer beside the Gradient Picker to reveal the different gradients to cull from.
Select the rainbow gradient, which is called Spectrum.
Next to the Gradient Picker are Gradient Manner options.
Past hovering the mouse over each square, Photoshop will indicate how the gradient will be placed in a sequence.
In this case, select the first box which is the chosen the Linear style.
The Linear style volition present the gradient in ane directly sequence.
Ready the Style to Normal and then the color volition fill with no alterations.
Gear up Opacity to 100% then the make full will be solid.
Now, with the mouse positioned on the left side of the circle, click and drag the mouse all the mode over the circle.
Equally the mouse is dragged, discover a line will appear indicating which way the gradient will get.
![]()
One time the mouse is on the right side of the circle, release the mouse.
The rainbow slope will appear in the circle in the same sequence in the Gradient Picker.
Endeavor clicking and dragging the mouse over the circumvolve in different directions to see the different directions the gradient can be directed.
To remove the pick around the circle, locate the peak of the workspace.
Click Select and in the drop-downwardly window select Deselect.

![]()
The moving outline will disappear.
Create a Circle: Using the Ellipse Tool
The Ellipse Tool creates a solid outlined selection of the created shape to and so be customized to take color fill the shape or have an outline around a shape. This tool allows a circle to be customized within the same tool. Although an ellipse shape is not evenly round, a Photoshop shortcut will allow the Ellipse Tool to turn the tool into a circumvolve tool.
Locate the left side of the workspace where the Tool Bar is located.
The Tool Bar provides multiple tools to be used throughout Photoshop.
The Ellipse Tool is a tool that is located within the Rectangle tab in the Tools Bar, which is identifiable by a rectangle shaped symbol. This tool is located in a higher place the Magnify Tool at the lesser of the Tools Bar.
Once located, select and hold the Rectangle Tool.
A side tab will announced revealing different shaped tool that can be used.
Select the Ellipse Tool, which is the 2nd tool in the tab.
Locate the summit of the workspace where the Ellipse Tool can exist customized.
Select the Tool Manner, which is located at the top left corner.
Set the Tool Way to Shape.
This will specify that the use for creating a circle is for creating a shape.
The Make full choice allows the circle to be with or without fill. This allows the circle to be filled with a solid color, gradient or pattern.
In this instance ready the fill to none, which is indicated by the white box with a ruby line beyond it.
Adjacent to the Fill is Stroke, which indicates how to outline the circumvolve. This pick is similar to Make full because information technology allows the circumvolve to be outlined with no colour, a solid color, a slope or a pattern.
In this case, select the circle to be outlined to no fill, which is indicated by the white box with a red line across it.
Beside Stroke, select the width of the stroke to 0 pt.
The Ellipse option allows a circle to be outlined or a circumvolve to accept a dotted outline.
With the cursor positioned towards the upper left corner, click and drag the mouse to the bottom right corner while property Shift on the keyboard.
Past holding Shift, this allows a perfect circle to be created. If Shift is not held, the circumvolve will turn into a oval shape.

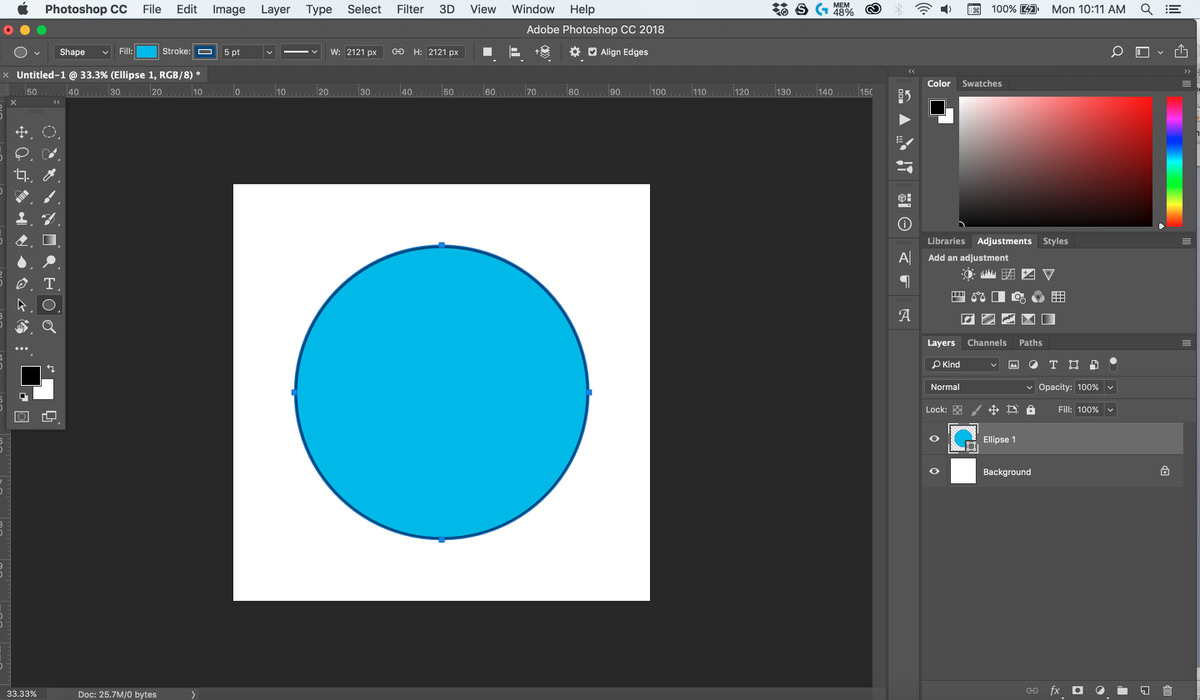
![]()
Notice how the new shape has created a new layer called Ellipse 1 in the Layers Panel on the right side of the workspace.
Since the shape has its own layer, the shapes tin be customized at any time.
3.two Ellipse Tool: Outline And Fill In Circumvolve With Solid Color
With the Ellipse one layer selected, which is located on the right side of the Layers Panel, select the Ellipse Tool.
Notice the options to customize the circle at the summit of the workspace.
Locate and select Fill for the driblet-down tab to appear.
Next to No Fill up, indicated past the white box with a scarlet line across, is the solid black square, which indicates to fill the circle with a solid color.
Select the solid black box.
Photoshop will automatically make full a colour into the square with the final color used in Photoshop.
To alter the color of the circle, locate the acme right corner of the Fill tab where a multicolored box is located. This is chosen the Color Picker, which allows whatever color to exist selected to fill the circle.
Select the Color Picker.
The Color Picker (Fill Color) window will announced.
The Color Picker window reveals a variety of colors to choose from or to type in the color code at the bottom of the window.
In this case, select a light bluish color.
One time selected, striking OK.
![]()
Notice how the circumvolve is filled in with the selected colour.
Next to Make full, select Stroke for the drop-down tab to appear.
Next to No stroke, indicated by the white box with a red line across, is the solid black foursquare, which indicates to make full the circle with a solid colour.
Select the solid blackness box.
Photoshop will automatically fill a color into the square with the terminal color used in Photoshop.
To modify the outline color of the circle, locate the top correct corner of the Stroke tab where a multicolored box is located. This is chosen the Color Picker, which allows whatsoever color to be selected to fill the outline.
Select the Color Picker.
The Color Picker (Stroke Color) window will appear.
The Color Picker window reveals a variety of colors to choose from or to type in the color lawmaking at the bottom of the window.
In this example, select a nighttime blue color.
Once selected, hitting OK.
Notice how the circle is filled in with the selected colour.
At present, side by side to Stroke type in five pt as the width of the line.
Set Shape Stroke Type to a solid line, which is located adjacent to the Stroke width setting.
![]()
3.iii Ellipse Tool: Fill In Circle With Gradient
With the Ellipse 1 layer selected, which is located on the right side of the Layers Panel, select the Ellipse Tool.
Observe the options to customize the circumvolve.
Locate the Fill option at the meridian of the workspace.
Select Fill and so the drop-downwardly tab appears.
Adjacent to No Fill, indicated by the white box with a red line beyond, is the black gradient square, which indicates to fill the circle with a gradient.
Select the gradient option, which is next to the solid black box.
Photoshop will automatically fill the circle with a gradient.
Photoshop volition provide dissimilar colored gradients to fill up, which can be selected or customized to create a new slope.
To customize a gradient, notice the Gradient Editor Dialog that automatically presents a blackness to white gradient bar.
The Gradient Editor Dialog bar allows whatsoever colors to be selected,the opacity, and the menstruum of the slope to be customized.
Notice the top pointer higher up the slope dialog bar.
The top arrows above the gradient betoken where the opacity starts and stops in the slope.
Opacity indicates how much of the color will be nowadays. For example, if the Opacity is fix to 50%, then the force of the color will over be 50%. This will allow other items behind the gradient to exist viewable.
The bottom arrows point where each colour starts and stops in the gradient.
If the color on the left is more desired, simply movement whatever bottom arrow to the right or left to have more of that color.
Now, find a small circumvolve on the bottom of the slope.
This indicates the Color Midpoint, which is where two colors merge. This allows the choice fro ane color to dominate the other in the slope.
Double-click on the bottom left arrow to modify the colour.
The Color Picker (Colour Stop) window volition announced.
Select an orange color and striking OK.
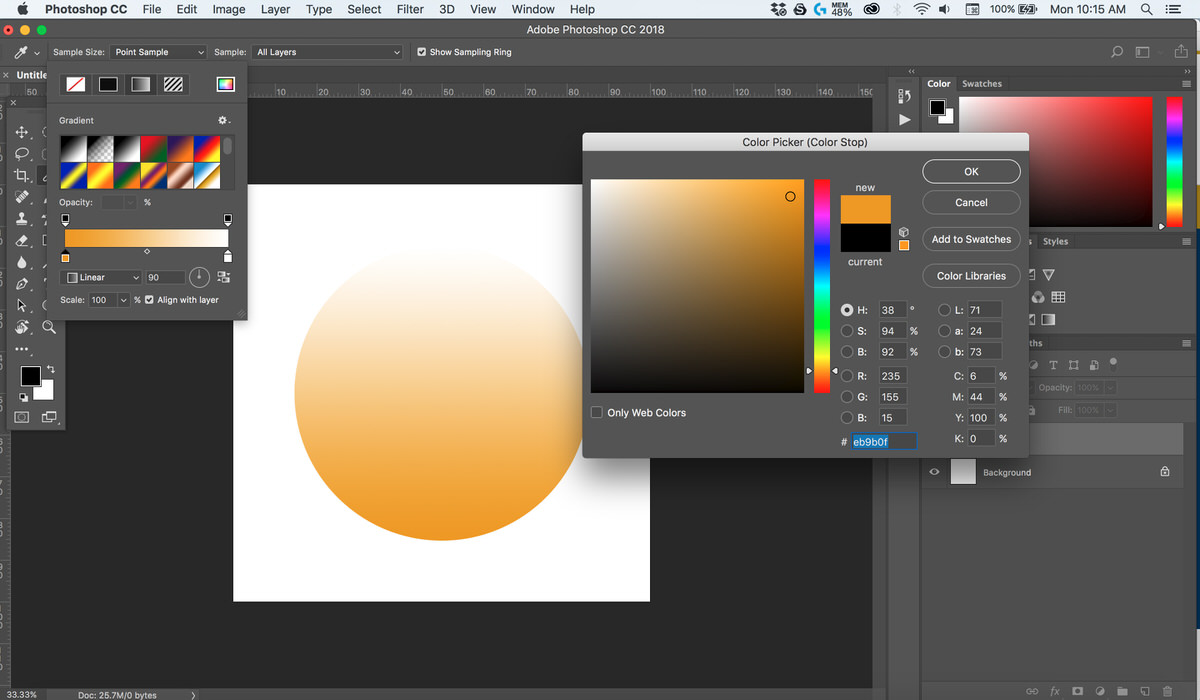
![]()
Notice how the gradient has filled the circumvolve.
The selected colour will now fill up the left side of the slope dialog.
Now, click and drag the bottom Color End arrow to the right.
Notice how the color fills more than of the slope.
Now, move the Colour Midpoint circumvolve on the bottom of the gradient dialog bar to the right.
Notice how the circle's gradient is afflicted.
At present, double-click on the bottom right arrow below the gradient dialog.
The Color Picker (Color Finish) window will appear.
Select a blueish color and hitting OK.
Locate the Linear option below the gradient dialog bar.
This indicates the manner of the gradient.
To change the style, simply click the tab and select the style.
The numbered box next to the Slope Fashion allows the angle of the style to be specified. In this case, Photoshop has automatically set the angle to 90 degrees.
Some other style to signal the angle is by the circle located in the numbered angle box. With the line directed towards the top of the circle, this indicated that the gradient would become down to up.

![]()
blossevillecoutiek.blogspot.com
Source: https://phlearn.com/tutorial/how-to-draw-a-circle-in-photoshop/